Showing posts with label craft. Show all posts

5.22.2012

making a to-do list...

for my hubby was on my to-do list :)  and i made one!  i was waiting to post this after he hung it up for me, but who knows when that will be...


i bought a frame from hobby lobby (50% off!)


i bought chalkboard paint and a sponge roller


i followed the directions from the can.  i painted two coats (opposite direction the second round) and let it dry over night.  i then flipped the glass over...


i made a stencil w/ my silhouette cameo, aka sally ;)


i used a rough, dry brush (to give it that rustic look) and brushed on white acrylic paint.


and then primed it by rubbing chalk all over...


works like a charm...well, sorta :/


4.12.2012

nifty stenciling...

has been my latest craft.  i use my silhouette cameo for making most of them, but you can make your own or even buy them at craft stores.  i posted pics on my last entry of an intricate cross i cut w/ my silhouette, aka "sally"...that's right, i named her!

i simply used double-sided tape to attach it to a chalkboard vinyl that sticks on my fridge and traced it w/ chalk!  chalkboards are popping up all over the place and thought some of you could try this technique.  i use my fridge chalkboard for diff things...depending on what's going on...holidays, birthdays, etc.  i chose a pretty cross for Easter...beautifully and simply stated :)


i've made several banners by cutting circles with a bottom of a wine glass!, cutting Easter eggs out w/ my sally and using a nifty stencil i bought from hobby lobby!  actually, i think it's made for painting and/or mod podging...

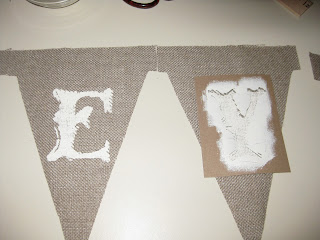
here's an easy tutorial on how to make a simple burlap banner using a stencil...

supplies needed:
banner stencil (or draw a rectangle on a piece of poster board/cardboard/cereal box and cut it out!)
material for banner (if you like burlap, i recommend using 100% linen burlap.  it's easier to work w/ and gives a cleaner finish)
marker
scissors
string (twine, ribbon, etc)
acrylic paint
small sponge or brush
stencil for letters


the great thing about this stencil is that is has holes drilled, and i can mark where i need to punch holes later.  i lined my traces right next to each other as to get the most out of my material :)


cut them out and flipped over so there wasn't any marks showing...


and lined them up.  i placed my stencils on top...


and even used a ruler to make sure my letters were placed about the same spot on each triangle.


and then i pained w/ a sponge!  (i forgot to use foil underneath and got paint on my counter, so don't forget to use something underneath!)

i also forgot to take pics of making the holes, but i just used a normal punch hole and it worked easily through the material.  i then used some string to string through...


this banner was used at a baby shower for a friend, and she now uses it in her baby's nursery :)  the burlap and string give a rustic and organic feel while the hand-painted letters give it that special touch!

*tips*
-the burlap i used came in a package.  it's pricier than normal burlap so don't forget a coupon ;)  i've been meaning to find out if it's sold by the yard.


10.03.2011

my first mod podge experience...

took place last month w/ my sis-in-law, christy, after we delved into the world of PINTEREST.  omgoodness, i was in love immediately!  we were both glued to our iphone/ipad oohing and aahing while looking at each other's screens.  i had seen it before while scoping new apps on my iphone but by-passed it as it looked a little confusing.  then my friend mary told me about it, and then i saw it popping up everywhere on facebook.  so, i gave in, and i am SO glad i did.  it's like craftgawker but soooo much better.  you find ideas on cooking, decorating, DIY projects, and even hair-do's!  oh, how i love it.  anyway, i came across two DIY canvas photos from thisismeinspired.blogspot.com and bluecricketdesign.net.  here are two that i have completed thus far (i plan to do two large one for the guest bedroom!)...


things to keep in mind:
use MATTE mod podge (i accidentally used lustre on the second)
paint your canvas FIRST

these instructions are a compilation of two diff projects


supplies needed:

scrapbook paper
canvas
paper cutter
matte mod podge
paint brush or sponge brush (to apply mod podge)
paint brush (to paint canvas)
sponge (to blot paint)


-trim your picture to fit on front of canvas

-trim your scrapbook paper to fit the sides of the canvas, trimming them leaving just a hint of canvas as a border


-paint entire canvas w/ mod podge and allow to dry (10 mins should do it)


-paint mod podge on back of paper and press firmly onto canvas


-w/ a sponge, carefully blot sides of photo w/ paint and allow to dry


-apply mod podge on back of photo


-and carefully apply to front of canvas


-use a towel to press photo firmly


-paint on mod podge to sides and front, it will look milky, but it will dry clear!


i purchased a tiny easel from joanne's and painted it the same color i used on the canvas


this is w/o the painted edges, and the canvas was painted after the paper and photo were glued on

so sorry if my instructions were confusing w/ the merge of both projects!!

this is such an easy project that leaves you w/ a very special looking piece of art for your home.  i think they make great gifts, too!

thank you so much christy, my dear, for joining me in my first mod podge adven-cha ;)


8.30.2011

let's try this again, shall we?

it's the much anticipated headband tutorial REPOST :)

Pin It

my latest fab mama jama continues her fabulosity by sharing her technique on how to make your very own sassy headband!  she not only is sharing, she photographed and documented each step and emailed me the whole tutorial!  christina, you ROCK!

alrighty lovelies, get crafty...and sassy ;)


Supplies:
1.5 inch wide satin ribbon in the
color of your choice
Felt
Hot glue gun
Scissors
Rubber headband in matching color (these also come in different widths – I’d go with the most narrow ones you can find)


Start by twisting the ribbon and rolling it around like a coil, twisting as you go…
(see next pic, too)


Apply a SMALL amount of glue as needed to hold the “coil” together. Remember to continuing twisting the ribbon as you wrap – this creates the bulk.


When your “coil” is as large as you would like it (mine are approximately 1.5 inches in diameter), wrap the ribbon to the back and tack it there with a small dot of hot glue.


Next, begin to loop ribbon as shown in the next couple of pictures, applying small dots of
glue in between each loop to hold them in place.


You don’t need a lot of glue at this point…just enough to keep the
flower from falling apart as you work with it.


Continue around until you have made your way back to where you started. I just happened to
reach the end of the piece of ribbon I had cut in this picture, but it may not work out the same
for you and that’s ok. If you have ribbon left, continue around again, making another layer of
loops (this time a little longer than the others so that they can be seen behind your first layer). Once I reached the end of my ribbon, I began again with a new piece.


Once you have finished making your loops (I use almost the entire roll of ribbon (usually 3 yds on each spool)), you should have a flower that stays together, but as seen here, is not completely glued
throughout. Go back in and add glue under some layers to secure them to the point that the flower can be held as one piece. You won’t be all that gentle with it in the next couple of steps, so you just want to
make sure it doesn’t fall apart in your hands!


Lift the “coil” as well and make sure that it is glued completely to the loops. Make sure that you don’t use too much hot glue…it will squeeze out and won’t be all that attractive on the flower. :/


Next, clip the loops so that they are now two pieces of ribbon on top of each other. Try to cut them in
front of the loop so that the piece that is left in front is shorter than the piece left in the back. You can
always go back and trim ribbon to different lengths, so don’t worry if it doesn’t work out thatway.


Once all the loops have been cut, you can go around the outside edge of the flower, trimming the longer pieces of ribbon so that it is all even and cut to the size you would like the flower to be.


Now begins the fun part…there is really no science to this…but you need those pieces of ribbon to fray! Using my thumb and index finger, I pinch and pull on the ends of each piece, pulling off strings from the edge.  Sometimes you get lucky and pull on one that just starts unraveling the ribbon (which I will pull for a bit and then cut it off).  Other times, you pull and tug and don’t seem to get anywhere. The point is to continue doing this all around until the flower reaches your desired level of fray‐ness. :)


Though it is hard to see here, when you pull on some of the strings, you may have pieces of ribbon
that seem to knot up…just pull them back apart. I yank and pull…it doesn’t matter if you tear something…you kind of want too! Make sure that you hold the flower in the center with one hand as you pull (this is where it is important that the layers are glued together well too).


When you feel like you have reached the look you are going for, go back and trim off any crazy,
out of place strings, etc. and finally glue down any other areas that need it.


Next, put a line of glue on the back of the flower and attach the rubber headband. Make sure that you put it on the right side (most of these headbands have what appears to be a thin line of hot glue on the inside of them to keep them from slipping off of your head).


Finally, cut out a circle of felt and glue it over the band. Lift up both sides of the band to ensure that it
is glued down completely and won’t life the felt off when you put the headband on.


Double check that everything is glued together and that there aren’t any other places that need
trimming…if not, you’re done!

  
christina's sweet madi


the firefly behind the fancy ;)


keeping my crazy hair intact :)


if you don't have the steady hands, or the time, OR you just don't feel like making one but really would love to have one...contact christina at fireflyfancy@gmail.com

7.06.2011

first crafty post...

let me start off by saying i hope you had a fantastic fourth of july weekend!  I LOVE THIS HOLIDAY!  we had a great weekend spent in the country w/ family and friends, and we came back to spend some time in our hometown as i love our small hometown celebrations :)

in my last post i mentioned a project my friends and i did (my whole hobby lobby fiasco) last week.  my friend brooke had mentioned in the beginning of summer that she wanted to try making tie-dye shirts w/ permanent markers.  i had never heard of it, and i was totally game!  so, i suggested we do red, white and blue shirts, and they turned out SUPER CUTE!


taken on the 4th after a HOT ride in the parade :)


my isabella is being a trooper...sophia, she's just telling you like it is, "HOT!"

now i totally forgot to take photos (of course i did) during the process.  so, i decided to make another one so i could show y'all step-by-step :)

WHAT YOU NEED:
white shirt
permanent markers
alcohol (91%)
dropper (or straw)
cardboard or cereal box (something to put b/w the front and back of the shirt)
any iron letters or appliques you wish to use
FRESH AIR (the strong markers and alcohol can do a number on you!)

first, stuff cardboard in the shirt so your marker and alcohol won't bleed thru


then draw a small burst of color (like a flower)


surround that first "flower" w/ a diff color all around it and continue to do so until you reach the size you desire.  you just want to make sure to leave room for others.
*please note that the 4th of july shirts i made was done w/ one "flower" right in the middle of the shirt


now for the fun part...
take your dropper (or straw and hold the top of the straw w/ one finger) and dip into the alcohol.
drop a little bit of alcohol in the center of one "flower", and then circle around each ring while releasing alcohol (the weaker percentage of alcohol, the more you'll need to use).


continue process on each "flower"


you'll start to see the colors bleed into each other...


after finishing each "flower" let it dry for about 10-15 minutes and then dry in your dryer.  once it's dried (should only take about 20 minutes) you can iron on decoration (follow directions to your specific decoration :)


now, i will say that i think these are a GREAT idea for a special occasion that your child might get one use out of :/  holiday wear, birthday party, etc.  there has been some mixed results w/ the washing (maybe my gal pals can comment?) ;)

i hope i wasn't too confusing!!!  please be patient w/ me as i hope practice makes perfect on relaying instructions for these projects!!!  coming up next...the REAL pineapple upside-down cake recipe aaaand, in the works, the very first FAB MAMA~JAMA OF THE MONTH!!!