9.28.2011

i'm a southerner...

but i am mexican, so i didn't grow up eating pot-pies, chicken n' dumplings or grits...none of that goes well w/ rice, beans, tortillas and sliced avocado (which there was ALWAYS fresh guac or sliced avocado on the dinner table, but i didn't grow to love the stuff until the last few years!  LOCO!)  anyway, my point to this glimpse of my upbringing is that i cooked and ate grits for the first time last night.  i have to say that they were rather tasty!  my husband happens to love the stuff, and i've been telling him for yeeeears that i would cook them sometime...but let's be honest, if i'm going to cook and cook something that i've never had before, i want to have a warm fuzzy that it's going to actually taste good.  the sounds of grrrr-its, isn't so appealing.  but as i've mentioned before, one of the reasons for this blog is for me to try new things and share those experiences.  so, lucky for you i followed a recipe and did it well enough to share :)  unfortunately, i did not document the cooking w/ photos (which is probably why i actually cooked it correctly!).  i will say that the recipe will be easy to follow and you know why?  it won't be in paragraph form like i read from...


why not list the instructions?

to make things worse, i actually took the above photo on my phone, lol!  i was looking through a southern living magazine at my friend mary's house when i spotted it :)  "this looks yummy...*click*"  thanks mary ;)

shrimp and grits (or as my gal, brooke named it "sandy grits")  don't you love it!?
unless noted, use salt, pepper, etc to taste

WHAT YOU NEED:
salt
pepper (i used pepper grinder for fresh ground)
1 cup instant grits (i used 3-minute brand)
1/2 cup shredded parmesan
1 lb peeled/deveined medium-size shrimp
olive oil cooking spray
1 tbsp olive oil
1 tbsp all-purpose flour
1 1/4 cup low-sodium chicken broth
1/2 cup chopped green onions
2-3 garlic cloves minced (i used 3...i always add at least one more clove than what is called for)
lemon (cut in half, ready to squeeze)
1/4 tsp hot sauce
2 cups baby spinach

PARMESAN GRITS:
-pour 4 cups water and salt in medium sauce pan, bring to a boil
-gradually whisk in grits
-cook over medium heat and stir occasionally for about 8 minutes or until thick
-stir in parmesan and pepper
-keep warm (i went ahead and poured them into a pie dish ready for the topping)

CREAMY SHRIMP SAUCE:
-spray skillet w/ olive oil and heat pan
-dump shrimp in and sprinkle w/ salt n peppa (...here and we in effect!)
-heat shrimp until just pink
-take shrimp out and set aside
-reduce heat and add oil
-whisk in flour for 1 minute
-whisk in broth, green onions, garlic, lemon juice, and hot sauce
-cook 2 to 3 minutes or until thickened (i had to add just a little more flour to thicken)
-stir in shrimp and spinach, cook until spinach is slightly wilted
-pour the saucy goodness over grits and enjoy!


as much as i enjoyed the meal, i explained to my husband (as he was going for a second helping) that i would much rather the creamy shrimpness over a bed of mashed potatoes :)  so, what i would love to try is making the creamy shrimp sauce and pour it over grilled chicken and mashed potatoes...mmmmm!

9.23.2011

she's a 4 year old...

...and for some reason i forget that.  A LOT.  i just don't understand it when my child whines over the silliest things or draws w/ a marker on her friend...SERIOUSLY!!??  i don't get it, and for the most part don't stand for it.  but really there are times when i need to look at my little girl and remember just that...she is a little girl and in her world changing into a different dress is HUGE to her.  this happened today and i told her, "no, you already have a dress on and if you want to 'play dress-up' you have dress-up clothes for that."  i mean i have enough laundry to tackle...

she cries, whines and i'm thinking, "really?  we're going to cryyy over this??"  i then tell her, "if you are going to cry about this you can cry about it in your room," and i walk off.  and then it hits me (or maybe it was God) that i need to stop being tired and deal w/ it...show her grace.  so, i go into her room and start trying to get her into a good mood.  i'm being my goofy self, and she smiles.  i just love on her, and she just flipped that whininess into happiness.


one of her dress-up dresses...which is actually one of my dresses!

i hope i don't sound like a terrible mom and all of you are thinking, "duh!"...i just felt like sharing this little story b/c i need to remember that her life is all about pretending to be rapunzel, eating chocolate and playing w/ ponies...and not having a costume change can bring a girl to tears.


it's fun to see her play w/ toys that i used to play w/...of course mine were a tad smaller

9.21.2011

another non-recipe

there was a time when my brain worked (pre-babies)...and i could actually follow a recipe.  people would eat my food and say, "that was delicious, sandra," and then i would simply state, "i can't take much credit.  i just followed the recipe."  wellll, next time i correctly follow a recipe and i dare serve it to anyone other than my hubby and children, i will reply to any compliments w/, "thank you!" and maybe even pat myself on the back and poor myself a much deserved glass of wine.  for those of you who have read any of my recipe posts, you will notice that i mess up...A LOT.  seriously, i cannot follow a recipe if my life depended on it!

in my last blog post, i mentioned a recipe i found in better homes and gardens.  it was for "gemelli w/ asparagus and sausage" and two days i ago bought all the needed ingredients.  i even mentioned to my friend mary how expensive fresh basil is.  i went on to explain that i had picked up one container that cost over $4 and then later replaced it w/ live growing basil in a bag for under $3 (i promise there is a reason for that whole shpeel).  i had planned on cooking yesterday but this mama has been working on coughing up a lung and there wasn't much energy to cook.  my sweet, sweet husband walked in the kitchen and saw all the ingredients sitting on the island and said, "do this tomorrow and we'll order in."  **SWOON**...**BIG HUG**...**BIG SMOOCHES**...thank you :).

i wasn't exactly feeling all that much better this evening, but the basil was only going to stay fresh for so long.  so, i start choppin', preparing and even took pictures to document the steps thinking i would share w/ you lovely ladies.


EVERYTHING is chopped and ready to go

i start boiling the water, cooking the meat, yada-yada-yada...


picture perfect (i'm super excited about my new YUM letters)

i continue the recipe.  i cook asparagus in the big pot for a few minutes and take it out and let it sit in a bowl.  i then cook pasta in the same pot.  the noodles are done, and i start taking them out and putting them  in the pan.  i take every last noodle out of the pot and into the pan, and then it hits me.  not only do i need a larger pan, but i was supposed to add the asparagus and other ingredients, let it marry and then add noodles.  SO, i spoon out the noodles and put them in another bowl (frustrated at the extra dishes being used).  i try to continue the recipe (in a wok) and then spot the mushrooms that should have been cooking w/ the onions and meat BEFORE everything else (now, i can't be too mad at myself as the mushrooms were added to the recipe by yours truly...again, i can't seem to follow a recipe).


whatever, i cook everything together, stir it up, serve them in bowls and sit at the dinner table.  i'm about to dig in when i realize...i forgot the basil.  FAIL.

i then heytell mary the basil incident and continue eating.  at the end of the day, it was still yummy and my fam enjoyed :)


little miss didn't miss the basil ;)

and my sweet, sweet mister walks in from exercising in the garage and asks how it's going (he had already witnessed the noodle transport).  i smile and say, "i forgot the basil.  i don't know what's wrong w/ me and why i can't read recipes!"...to which he says, "it's only b/c your sick."  oh honey...

9.19.2011

HEB after dark


grocery store at night = strange and lonely single men wandering around looking for conversation.  i'm waiting in line behind one man who just had an "i'm in a bad mood and can't wait to get out of here and this cashier is taking way too long" look on his face.  i'm standing there eyeing the magazines and wondering should i grab the real simple magazine that will tell me how many ways to utilize a toilet paper roll OR the home and gardens magazine that i'm sure is filled w/ comfort food recipes for fall.  i decided on the latter and reach for it while noticing the guy behind me is watching me.  and mind you, i decide to pick up a magazine from the middle of the stack b/c i want an untouched one (anyone else do that or am i strange?)  anyway, i'm thinking to myself this guy probably thinks i'm totally cuckoo for coco puffs b/c he saw me do this.  and sure enough the guy starts talking to me...

strange man - you reeeeally want to know what it's in the better homes and gardens (walking closer to me)

me- uh yeah (giggling b/c i'm wondering why is he saying this to me?) actually i do

strange man - you have my permission to buy it

me - **look at him like he's smoking crack w/ a side of bewilderment** (noticing there isn't but a foot b/w me and the man in front of me and the chatty mr. cathy behind me)

strange man - not that you need my permission

me - yeah, thanks, i appreciate it

**crickets**


september's issue and my next recipe...mmmm....

9.14.2011

i'm a work in progress...

as is this blog :) i've brought back the "follow by email" and i've added a list of subjects that you can click on if you wish to find something crafty, recipe, etc.  it's an attempt to be more organized, and i'm having to backtrack to add old posts to the list so please be patient. i often describe myself as "a work in progress" and seriously want to make a t-shirt saying just that! my fellow blogger, jenny, calls herself "messy" and it's all good...click the fun yellow box and take a gander of what she has to say...


thanks for shining light on this lady!  and jenny, anytime you want to have a bonfire and throw in toilet bowl brushes and rubber gloves, count me in...i'll bring the smores!!

9.05.2011

princess in training...

i had plans of making a chore chart for my 4 year old, but i started thinking a lot of what i want her to do on her own (w/o me reminding her) had more to do w/ her personal hygiene.  so, i decided to create a chart of things that i would like her to have as habits.  and since she LOVES anything princess, i thought a chart of "princess" habits would be perfect!  we told her when she reaches the end of the board w/ stickers she gets to go to target and pick out a toy :)  also, since i believe in baby steps i thought this would get her used to the idea of a check-off system and an actual chore chart will come to play in her near future :)

so, here's her princess chart made on poster board w/ scrapbooking touches and glitter (i am on a glitter kick!)


very simple, temporary, not a lot of work and pleasing to my princess' eyes ;)


excited to pick out her stickers


just as excited to put them on the chart by herself


very proud of her made bed :)

8.31.2011

have you ever...

piled the children in the car, drove to the local fast food joint and ate dinner in the parking lot?  me either...until tonight!  honestly, my day wasn't that bad, but it only takes those last couple of hours of the afternoon, before daddy arrives and the kids are making me go bananas!  unfortunately for me, it was my hubby's night to exercise so there wasn't any relief coming through the door.  so instead, i took the girls to whataburger...


they were contained, watching cartoons, eating and happy...and mama was, too :)

let's say it wasn't one of those days and cooking was on the agenda.  i have a very yummy recipe that is quick, easy and the whole fam will devour!

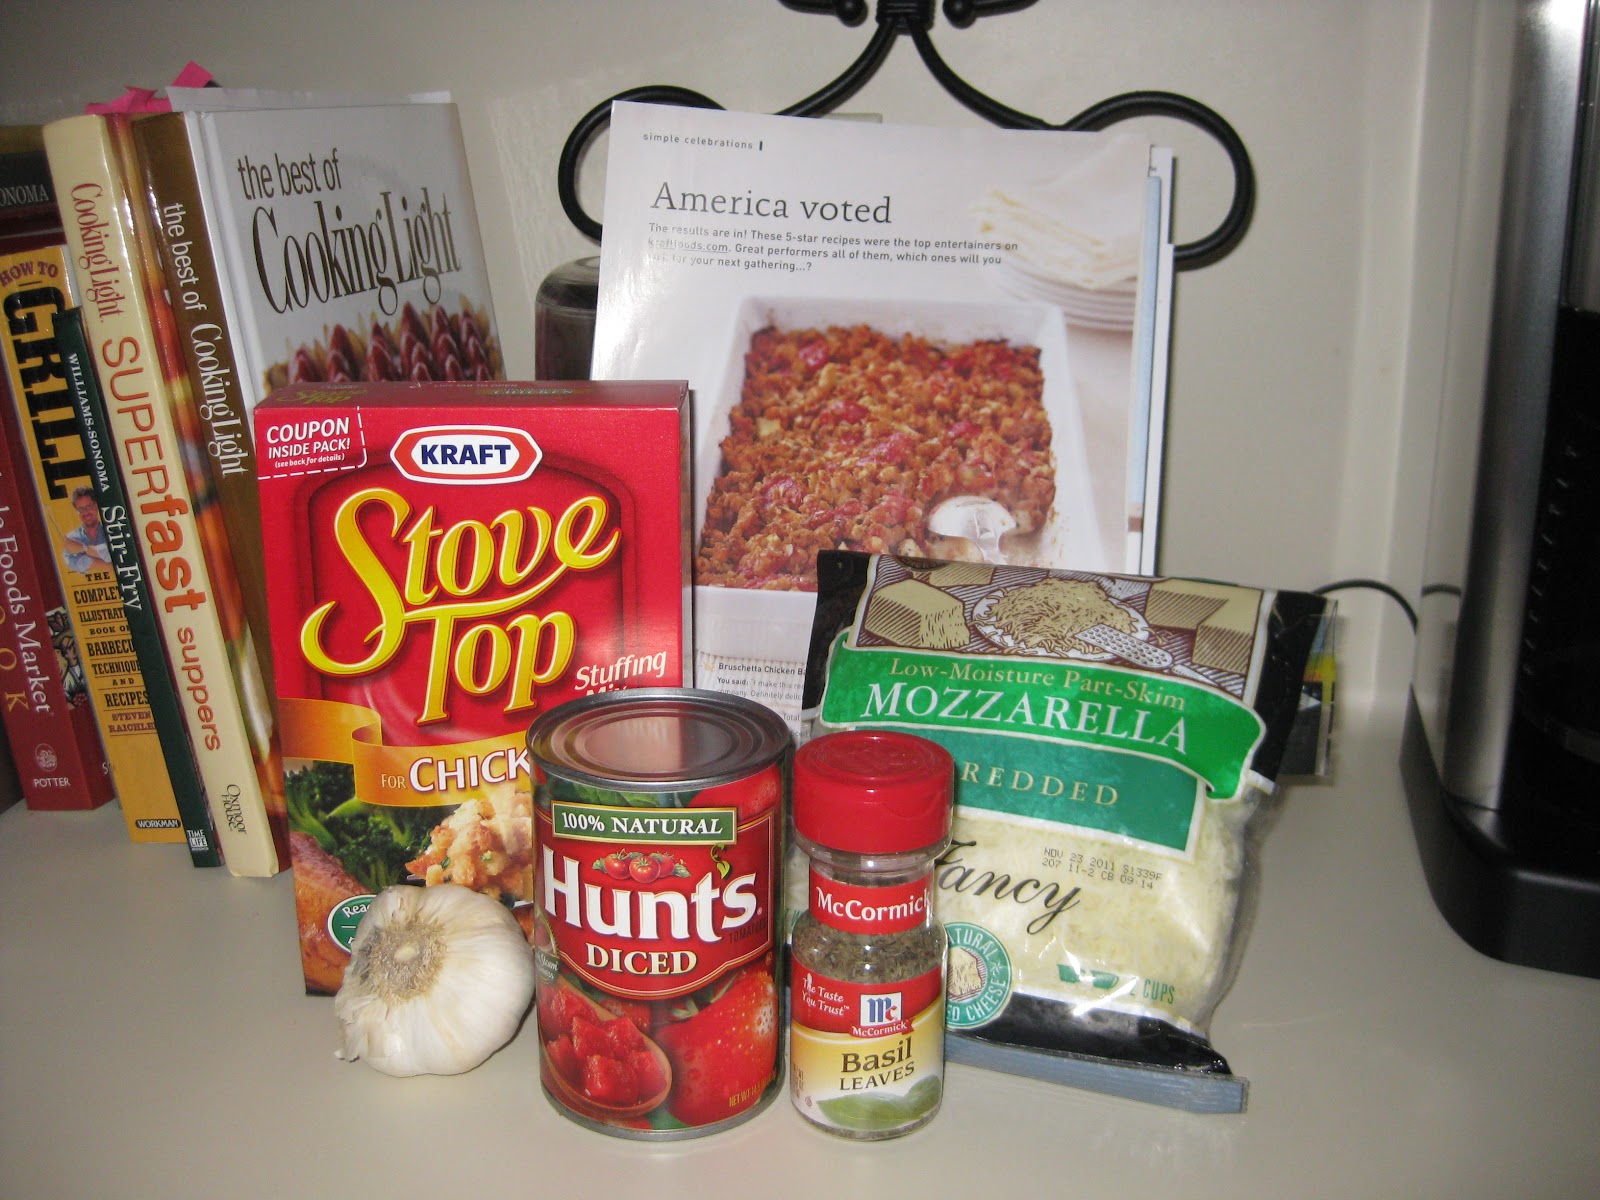
bruschetta chicken bake


you will need:
1 can (14.5 oz) diced tomatoes, undrained
1 pkg (6 oz) stove top stuffing mix for chicken
1/2 cup water
2 cloves garlic, minced (i used 3)
1 1/2 lb boneless skinless chicken breasts, cut into bite-sized pieces
1 tsp dried basil leaves
1 cup kraft shredded low-moisture part-skim mozzarella cheese (i bought store brand)

preheat oven to 400 degrees


empty entire can of diced tomatoes (w/ juice) in a medium bowl, add stuffing, water and garlic.  stir just until stuffing is moistened.  set aside.


place chicken in 13x9-in baking dish and sprinkle the chicken w/ basil and cheese (i added salt and pepper...no, i didn't start playing "push it", the seasoning not the 80s duo!)


top w/ stuffing mixture


bake for 30 minutes or until chicken is cooked through


enjoy!

fyi...

i found this recipe in some random kraft foods magazine...

i could've sworn the chicken needed to be cooked before placing in the oven and almost cooked the chicken in a skillet before my hubby caught me...


i started to sprinkle the cheese and basil on the baking dish before putting the chicken in before my hubby caught me...

the hubster thought i needed more chicken and added some more (frozen mind you)...


my hubby just-so happened to offer his help w/ dinner that night...thank goodness :)

i would love to try this recipe w/ adding mushrooms and artichoke!  it wouldn't exactly be a "bruschetta bake," but i bet it would be dee-lish!

8.30.2011

let's try this again, shall we?

it's the much anticipated headband tutorial REPOST :)

Pin It

my latest fab mama jama continues her fabulosity by sharing her technique on how to make your very own sassy headband!  she not only is sharing, she photographed and documented each step and emailed me the whole tutorial!  christina, you ROCK!

alrighty lovelies, get crafty...and sassy ;)


Supplies:
1.5 inch wide satin ribbon in the
color of your choice
Felt
Hot glue gun
Scissors
Rubber headband in matching color (these also come in different widths – I’d go with the most narrow ones you can find)


Start by twisting the ribbon and rolling it around like a coil, twisting as you go…
(see next pic, too)


Apply a SMALL amount of glue as needed to hold the “coil” together. Remember to continuing twisting the ribbon as you wrap – this creates the bulk.


When your “coil” is as large as you would like it (mine are approximately 1.5 inches in diameter), wrap the ribbon to the back and tack it there with a small dot of hot glue.


Next, begin to loop ribbon as shown in the next couple of pictures, applying small dots of
glue in between each loop to hold them in place.


You don’t need a lot of glue at this point…just enough to keep the
flower from falling apart as you work with it.


Continue around until you have made your way back to where you started. I just happened to
reach the end of the piece of ribbon I had cut in this picture, but it may not work out the same
for you and that’s ok. If you have ribbon left, continue around again, making another layer of
loops (this time a little longer than the others so that they can be seen behind your first layer). Once I reached the end of my ribbon, I began again with a new piece.


Once you have finished making your loops (I use almost the entire roll of ribbon (usually 3 yds on each spool)), you should have a flower that stays together, but as seen here, is not completely glued
throughout. Go back in and add glue under some layers to secure them to the point that the flower can be held as one piece. You won’t be all that gentle with it in the next couple of steps, so you just want to
make sure it doesn’t fall apart in your hands!


Lift the “coil” as well and make sure that it is glued completely to the loops. Make sure that you don’t use too much hot glue…it will squeeze out and won’t be all that attractive on the flower. :/


Next, clip the loops so that they are now two pieces of ribbon on top of each other. Try to cut them in
front of the loop so that the piece that is left in front is shorter than the piece left in the back. You can
always go back and trim ribbon to different lengths, so don’t worry if it doesn’t work out thatway.


Once all the loops have been cut, you can go around the outside edge of the flower, trimming the longer pieces of ribbon so that it is all even and cut to the size you would like the flower to be.


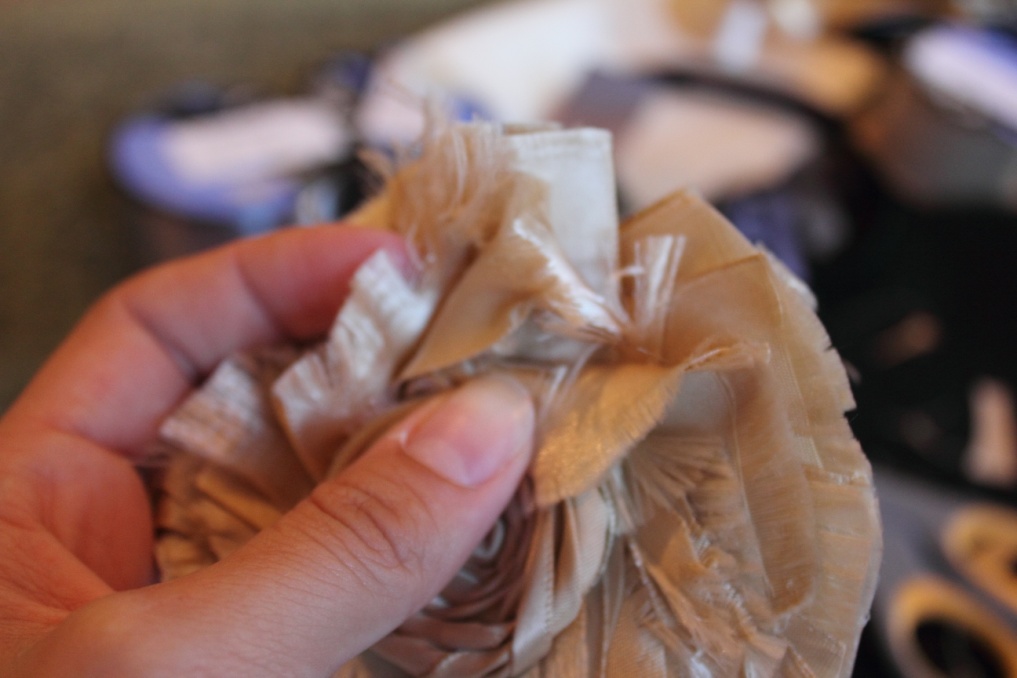
Now begins the fun part…there is really no science to this…but you need those pieces of ribbon to fray! Using my thumb and index finger, I pinch and pull on the ends of each piece, pulling off strings from the edge.  Sometimes you get lucky and pull on one that just starts unraveling the ribbon (which I will pull for a bit and then cut it off).  Other times, you pull and tug and don’t seem to get anywhere. The point is to continue doing this all around until the flower reaches your desired level of fray‐ness. :)


Though it is hard to see here, when you pull on some of the strings, you may have pieces of ribbon
that seem to knot up…just pull them back apart. I yank and pull…it doesn’t matter if you tear something…you kind of want too! Make sure that you hold the flower in the center with one hand as you pull (this is where it is important that the layers are glued together well too).


When you feel like you have reached the look you are going for, go back and trim off any crazy,
out of place strings, etc. and finally glue down any other areas that need it.


Next, put a line of glue on the back of the flower and attach the rubber headband. Make sure that you put it on the right side (most of these headbands have what appears to be a thin line of hot glue on the inside of them to keep them from slipping off of your head).


Finally, cut out a circle of felt and glue it over the band. Lift up both sides of the band to ensure that it
is glued down completely and won’t life the felt off when you put the headband on.


Double check that everything is glued together and that there aren’t any other places that need
trimming…if not, you’re done!

  
christina's sweet madi


the firefly behind the fancy ;)


keeping my crazy hair intact :)


if you don't have the steady hands, or the time, OR you just don't feel like making one but really would love to have one...contact christina at fireflyfancy@gmail.com

8.29.2011

yikes...

sorry the photos are not coming up on the headband tutorial :/  working on it!!!

until then, chew on this...i was praying the other night while a george michael song was acting as background music in my head...what is that about???  and no, now i cannot remember the song, but who else has a soundtrack playing while talking to God?  or who else will admit that?...lol

8.28.2011

the much anticipated...

flower headband tutorial!!!

my latest fab mama jama continues her fabulosity by sharing her technique on how to make your very own sassy headband!  she not only is sharing, she photographed and documented each step and emailed me the whole tutorial!  christina, you ROCK!

alrighty lovelies, get crafty...and sassy ;)

Supplies:
1.5 inch wide satin ribbon in the
color of your choice
Felt
Hot glue gun
Scissors
Rubber headband in matching color (these also come in different widths – I’d go with the most narrow ones you can find)


Start by twisting the ribbon and rolling it around like a coil, twisting as you go…
(see next pic, too)


Apply a SMALL amount of glue as needed to hold the “coil” together. Remember to continuing twisting the ribbon as you wrap – this creates the bulk.


When your “coil” is as large as you would like it (mine are approximately 1.5 inches in diameter), wrap the ribbon to the back and tack it there with a small dot of hot glue.

Next, begin to loop ribbon as shown in the next couple of pictures, applying small dots of
glue in between each loop to hold them in place.


You don’t need a lot of glue at this point…just enough to keep the
flower from falling apart as you work with it.


Continue around until you have made your way back to where you started. I just happened to
reach the end of the piece of ribbon I had cut in this picture, but it may not work out the same
for you and that’s ok. If you have ribbon left, continue around again, making another layer of
loops (this time a little longer than the others so that they can be seen behind your first layer). Once I reached the end of my ribbon, I began again with a new piece.


Once you have finished making your loops (I use almost the entire roll of ribbon (usually 3 yds on each spool)), you should have a flower that stays together, but as seen here, is not completely glued
throughout. Go back in and add glue under some layers to secure them to the point that the flower can be held as one piece. You won’t be all that gentle with it in the next couple of steps, so you just want to
make sure it doesn’t fall apart in your hands!


Lift the “coil” as well and make sure that it is glued completely to the loops. Make sure that you don’t use too much hot glue…it will squeeze out and won’t be all that attractive on the flower. :/


Next, clip the loops so that they are now two pieces of ribbon on top of each other. Try to cut them in
front of the loop so that the piece that is left in front is shorter than the piece left in the back. You can
always go back and trim ribbon to different lengths, so don’t worry if it doesn’t work out thatway.

Once all the loops have been cut, you can go around the outside edge of the flower, trimming the longer pieces of ribbon so that it is all even and cut to the size you would like the flower to be.


Now begins the fun part…there is really no science to this…but you need those pieces of ribbon to fray! Using my thumb and index finger, I pinch and pull on the ends of each piece, pulling off strings from the edge.  Sometimes you get lucky and pull on one that just starts unraveling the ribbon (which I will pull for a bit and then cut it off).  Other times, you pull and tug and don’t seem to get anywhere. The point is to continue doing this all around until the flower reaches your desired level of fray‐ness. :)


Though it is hard to see here, when you pull on some of the strings, you may have pieces of ribbon
that seem to knot up…just pull them back apart. I yank and pull…it doesn’t matter if you tear something…you kind of want too! Make sure that you hold the flower in the center with one hand as you pull (this is where it is important that the layers are glued together well too).


When you feel like you have reached the look you are going for, go back and trim off any crazy,
out of place strings, etc. and finally glue down any other areas that need it.


Next, put a line of glue on the back of the flower and attach the rubber headband. Make sure that you put it on the right side (most of these headbands have what appears to be a thin line of hot glue on the inside of them to keep them from slipping off of your head).


Finally, cut out a circle of felt and glue it over the band. Lift up both sides of the band to ensure that it
is glued down completely and won’t life the felt off when you put the headband on.


Double check that everything is glued together and that there aren’t any other places that need
trimming…if not, you’re done!


christina's sweet madi and the firefly behind the fancy ;)


keeping my crazy hair intact :)


if you don't have the steady hands, or the time, OR you just don't feel like making one but really would love to have one...contact christina at fireflyfancy@gmail.com